#simplestamping congratulations

Magnolia Congrats wm

Another month, another #simplestamping challenge from Stampin’ Up!

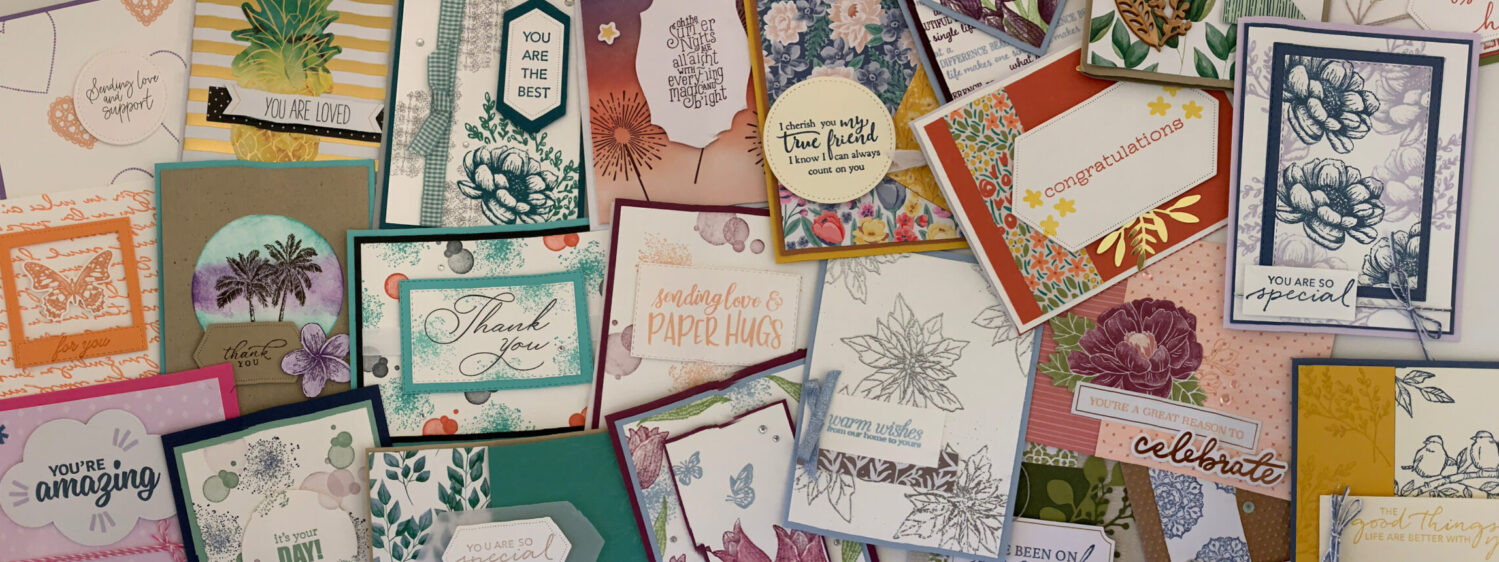
With all of the challenges the idea is to keep the card simple (of course), something that would be easy for a beginner to take on and not use too many products (e.g. stamps, ink and paper only). For this month’s challenge we were asked to make a congratulations or celebration card and we could also use an embellishment in addition to the stamps, ink and paper.

As soon as I started thinking of ideas for this challenge I immediately thought of the Magnolia Blooms set from the Beginner Brochure. And while we weren’t able to use Designer Series Paper, my colour combination was inkspired by the Magnolia Lane Designer Series Paper colours (e.g. Mossy Meadow, Petal Pink, Whisper White, etc.).

For the card base I used Petal Pink cardstock and Mossy Meadow cardstock for the card mat. I stamped the magnolia images on Whisper White cardstock and decided on Petal Pink for the smaller flowers and Mossy Meadow for the large flower and “congratulations”. In keeping with the idea of #simplestamping and not wanting it to look too overwhelming I only stamped a few magnolias. Then for the embellishment I used two pieces of the Silver 3/8″ Metallic Edge Ribbon. The first I adhered to the Whisper White card front using SNAIL Adhesive and then I tied a smaller piece onto the larger piece to make a bow.

I really love how the ribbon steps up this card without having to add too much! I hope you enjoy this card as much as I enjoyed making it.

Frosty Snowman

Snowman Vellum wm

I’ve been having so much fun creating with the Snowman Season photopolymer stamp set and I still have a bunch of ideas swirling around in my head. These snowmen are just too cute!! This is a stamp set I’ll definitely be holding onto even if they don’t carry it over!

For this card I used Seaside Spray cardstock as the card base and Pool Party cardstock for the card mat. I love using different shades of blue for holiday cards, especially when the main focus is snowmen and snowflakes.

I also love the frosty effect of the Vellum so I stamped on it as well as Whisper White cardstock. I stamped the snowman on the Vellum using Tuxedo Black Memento ink first to allow it some time to dry. On the Whisper White card front I stamped the snowflakes in both Seaside Spray and Pool Party ink.

To adhere the vellum to the Whisper White card front I used Multi-purpose Liquid Glue at the centre of a few of the snowflakes to help disguise the glue. It worked really well, I can’t even tell which snowflakes are the ones I added glue to.

The phrase for this card also comes from the Snowman Season stamp set and I stamped it in Seaside Spray and then cut the ends of the cardstock to create a banner. I then popped up the banner using some Stampin’ Dimensionals on top of a piece of Seaside Spray 1/4″ Metallic Ribbon. For a little extra bling (cause I just couldn’t resist) I added a few rhinestones on the vellum like snowflakes.

I can’t get over how cute these snowmen are and I can’t wait to get creating with this stamp set (and maybe even the punch) again!

Modified Z-fold with First Frost

First Frost Modified Z Fold wm

I totally fell in love with the Feels Like Frost Specialty 6 x 6 Designer Series Paper as soon as I saw it in the Holiday Catalogue! The pictures are amazing and like many demonstrators I’ve been having a hard time cutting it up to use… somehow it feels wrong. So when I saw a similar project by Rachel Tessman (a fellow demonstrator) on Facebook I had to try it out.

It’s a version of a Z-fold card and allows you to use just about an entire 6 x 6 sheet of DSP. The sheet I chose for this card I thought would coordinate really well with Purple Posy cardstock, plus I love how the branches look covered with ice.

The phrase and image came from the First Frost cling stamp set and I stamped using the Purple Posy Stampin’ Write Marker for the ink colour. I also used the Stitched Shapes dies and a couple of Stampin’ Dimensionals to pop up the phrase, then I added a Rhinestone Basic Jewel to play off the sunlight off of the icicles on the DSP.

As for the paper… I cut the DSP into 3 strips: 2 3/4″ x 5 1/4″, 1 1/8″ x 5 1/4″ and 2 1/8″ x 5 1/4″. I cut one strip of Whisper White cardstock for the 4th panel; 1 7/16″ x 5 1/4″. For the Purple Posy card base I took a 5 1/2″ x 8 1/2″ piece and scored it at 3″, 4 6/16″ and 6 3/4″.

I love how this card turned out! So much that I may have to make a few more with some of the others sheets from this pack.

Christmastime is Here!

Well…. actually it’s November and the Christmastime is Here suite of products is here. A Christmas suite that’s a bit unconventional!

Christmas time is here bundle

With the holidays only 50 days away it’s time to start your holiday crafting, if you haven’t already (which I haven’t). This suite of products offers just about everything you could possibly need for creating holiday cards, tags and even gift wrap. Plus with this suite you can get all of it or just the products you want.

So here’s what is in the suite….

To start there is the Christmas Rose photopolymer stamp set which includes 13 stamps with a variety of images and phrases. This set coordinates with the Roses dies, 7 in total, and can be purchased as a bundle and will save you 10%.

Christmastime stamps and dies

Every good suite needs Designer Series Paper and this 12 x 12 pack of specialty DSP offers designs that coordinate with the rose images from the stamp set as well as more traditional Christmas images. There are 12 sheets in the pack and you get 4 sheets of the 3 double-sided designs.

Christmastime DSP

And of course you can’t forget the bling! There are two options as part of the Christmastime is Here suite. One is the Gold 1/4″ Shimmer Ribbon (10 yards) and the other is the pack of Gold Glitter Enamel Dots (4 different sizes and 160 dots in total).

Another reason to love this suite is that it has it’s very own bracelet! The Rose bracelet has a rose charm as well as a Stampin’ Up! charm and comes in it’s very own designer box, so you can give yourself a little something or give a gift to that special stamper in your life.

Christmastime bracelet

To get your inkspiration going here are a couple of samples created using the Christmastime is Here suite of products….

To get your Christmastime is Here products and whatever else you may need head over to my website. I’m also happy to answer any questions that you may have, you can email me at inkspirationwithteresa@gmail.com.

www.stampinup.com/inkspirationcards/christmastimeisheresuite

Happy Halloween!

Sept 2019 wm

The September Paper Pumpkin kit offered some great Halloween treat boxes. I’m not usually much for making Halloween cards and we get too many trick or treaters to use these for handing out candy, but this kit was so cute. I had a lot of fun creating with it!

Once I’d made the treat boxes following the Paper Pumpkin instructions, I set out to make a couple of alternative projects.

Sept 2019 alt wm

The first was an alternative tag for one of the treat boxes. I used the “Eat If You Dare” stamp and stamped a few Gorgeous Grape skulls onto one of the vellum circles.

Then I created a Halloween card. I used one of the sides from each of the treat boxes and then cut them in half to create these squares. The skeletons in the background are simply stamped using Whisper White ink and the one on the tag, as well as “Happy Halloween”, I heat embossed with White Stampin’ Emboss powder.

Sept 2019 alt card wm

I haven’t gotten to making the Haunted House using this kit (including the box it came in), but I’m hoping that I’ll be able to soon. Once I do I’ll post it here.

Happy Halloween everyone!

A Harry Potter Birthday!

This past weekend was my daughter’s birthday party and she’s really gotten into Harry Potter (we’re currently working our way through The Deathly Hallows), so I knew that it was only a matter of time until she wanted a Harry Potter themed birthday party. So when she said that’s what she wanted this year, my Pintrest boards and I were totally prepared!

Over the summer she and I went through my pins and she chose what activities she wanted to have (table top Quidditch), food (sorting cupcakes and a Honeydukes candy shop) and a few other things. Of course I kept a few things to myself to surprise her!

With the party on it’s way to planned, the next thing was the invitations. The inkspiration for the invitation came from some thank you cards created by a fellow Stampin’ Up! demo Wendy Cranford (https://luvinstampin.com/harry-potter-party-thank-you-cards) and I used a combination of current and retired products for this card.

To create the Hogwarts House colours on the outside of the card I used Cherry Cobbler and Crushed Curry for Gryfindor, Daffodil Delight and Basic Black for Hufflepuff, Emerald Envy (retired) and Smoky Slate for Slytherin and Dapper Denim (retired) and again Smoky Slate for Ravenclaw. To have a different shade of grey for one of the last two houses you could use Grey Granite (I didn’t have any in my stash).

Then I heat embossed “you’re invited” using White Stampin’ Emboss powder. On the inside I used some images from the retired stamp set Spooky Cat. The owl, hat and outline of the potion bottles are stamped using Tuxedo Black Memento ink and the potions themselves are stamped using Bermuda Bay, Lemon Lime Twist (retired) and Pumpkin Pie ink.

For the party itself, I recreated Platform 9 3/4 by simply sponging paint onto a shower curtain and hot glued and then painted wands for the girls to “choose”. It took a lot of gold paint to create this version of table top Quidditch and I almost ended up looking like a golden snitch.

Then there is the card for the birthday girl herself! She is a Hufflepuff so I used the same idea for her birthday card that I used for the invitations; only using Daffodil Delight and Basic Black. This time I used the Broadway Birthday photopolymer stamp set and the Stitched Nested Labels dies.

For both the invitation and the birthday card I used a Gatefold and then popped up the phrase on one side using Stampin’ Dimensionals. The dimensions that I used for these cards are as follows….

  • 8 1/2″ x 5 1/2″
  • Scored at 2 2/16″ and 6 6/16″
  • The strips with a small border around the edge measured 2″ x 5 6/16″ for the full size and 2″ x 10/16″ for the half size.
  • The stripes for all the cards were 1/2″ wide and about 2 3/4″ long (I just cut off the edges once I had them all adhered into place)

I hope you enjoyed these as much as my daughter did!

Snowman Season is Coming!

Snowman Season wm

I’ve had the Snowman Season bundle for a little while now, but with my oldest munchkin’s birthday party this coming weekend I haven’t had a chance to create with it yet. Finally some of the ideas that have been floating around in my head are starting to be able to get out. This card is the first of many to come.

The idea for this card originally came from a sketch challenge that I was hoping to participate in, but wasn’t able to pull together in time. Some elements have changed from the initial sketch but the original colour combination I chose stayed the same; Pool Party and Pretty Peacock.

I used Pool Party cardstock for my card base and Pretty Peacock cardstock my card mat. The card front is Whisper White cardstock, which is what I also used to stamp the phrase and snowman on. The strip of Designer Series Paper is from the Feels Like Frost 6×6 specialty pack. I’ve had a few strips left over from projects using the other photograph side and have been just waiting for an opportunity to use it!

On the card front I stamped the larger snowflakes using Pool Party ink and the smaller snowflakes using Pretty Peacock ink. The “Merry Christmas” was also stamped using Pool Party and the snowman with Tuxedo Black Memento ink.

Once the snowman was dry I used Stampin’ Blends to colour his nose (Pumpkin Pie) and add a little colour to his scarf (Pool Party).

I framed the snowman using the largest oval from the Stitched Shapes dies and attached him using SNAIL Adhesive. Once I adhered the phrase and DSP together I popped it up with a couple of Stampin’ Dimensionals.

To finish it off I added a few of the smallest Rhinestone Basic Jewels randomly to the card front.

I’m hoping that once my oldest’s birthday party is over I’ll be able to post the odd template/project sheet.

In the meantime if you’re missing the project sheets make sure to add yourself to my email list! (contact me page) We’re in week 3 of my 12 Weeks of Christmas, which means a different holiday themed project sheet is emailed right to you, complete with a supply list and step by step instructions. I hope to see you in your inbox!

Sketch Challenge with Beautiful You

PCC 355

This week’s Paper Craft Crew Challenge was a horizontal sketch challenge and when I was thinking of what stamp set to use I took advantage of this opportunity to create a birthday card for my mom using the Beautiful You cling stamp set!

For colour combination, I went with one that I haven’t used before but sparked a little something in me as I wanted bright colours; Grapefruit GroveMint Macaron and a splash of Smoky Slate cardstock. For stamping I used Grapefruit Grove for the squiggles of colour, Mint Macaron for the phrase and Tuxedo Black Memento ink for the woman dancing. These were all stamped on Very Vanilla cardstock.

For the bow I used some Mint Macaron thick twine from the Nature’s twine pack and then added a bow using Gold Metallic thread (retired) on top.

Gorgeous Birthday wm

I really enjoy participating in these challenges as the often spark different ideas than I might have thought of usually. I hope my mom likes it!

#simplestamping with Beauty Abounds

Beauty Abounds Punch wm

This month Stampin’ Up!s #simplestamping challenge was to create a thank you card using only stamps, ink, paper and punches. When thinking of which stamp set to use for this challenge I decided to go with the Beauty Abounds cling stamp set. I love butterflies so I create with this stamp set whenever I can, but I also like this one because of the number of different images in this set and because it can create nice effects on your projects simply by stamping!

Colour wise I was initially thinking of doing something with purples and greens (a favourite colour combo of mine), but once I got to pulling out supplies my inkspiration was pulled towards Pool Party and Pretty Peacock (one of the newest In Colours).

For the card base I used Pretty Peacock cardstock and then Pool Party cardstock for the card mat. I stamped the phrase and images on Very Vanilla cardstock. For the “thanks” and smaller bubbles I used Pretty Peacock ink and for the butterflies and larger bubbles I used Pool Party ink.

Then to tie in with all the stamped bubbles I used the 2 1/4″ Circle Punch to punch out the phrase and butterflies as well as another piece of Pretty Peacock cardstock.

Things didn’t stop there though… I also created a more simple version without using a punch (just stamps, ink and paper, on the left) as well as a stepped up version (on the right).

To step up this card even more I used the Stitched Shapes dies to cut out the phrase as well as to create a Pretty Peacock border behind it. I popped these squares up using Stampin’ Dimensionals and then added a little bit of bling with a few Rhinestone Basic Jewels. I thought of also adding some Silver Metallic Thread, but I didn’t have any in my craft stash 🙁   (I will have to fix that asap!).

Puffy First Frost

First Frost Puff Close Up wm

When thinking of Christmas/Holiday colours there’s the standard red, green and gold or sometimes you’ll see blue and silver. I’ve seen some interesting combinations when people have created cards using unconventional colours and for this week’s project this combination is a favourite of mine!

I used Smoky Slate cardstock for my card base and Mint Macaron cardstock for the card mat. I stamped on Whisper White cardstock using the First Frost cling stamp set. For the leaves and buds I used Mint Macaron ink and stamped off first for the leaves before stamping on the Whisper White card front. Then I embossed the card front using the Softly Falling Textured Impressions Embossing Folder.

For the phrase I stamped in Versamark ink and then heat embossed Silver Stampin’ Emboss Powder. I then used the Delightful Tag Topper Punch and popped it up using Stampin’ DimensionalsI also stamped 3 flowers with Smoky Slate ink which I then cut out and used some Puff Paint in the centre of the flowers. The Heat Tool helped raise and set the Puff Paint nicely and I like how the Rhinestone Basic Jewels add a little something extra but also pull in the silver from the embossing powder.

First Frost Puff wm

Over the next few weeks there are not going to be as many project sheets here on the blog as there’s a lot going on right now. I’m in the midst of putting together my oldest’s 10th birthday party (how did that happen?!) and my 12 Weeks of Christmas has started. This is something just for my email subscribers and offers ideas for cards, tags, gift wrap and more. If you would like to join my mailing list and get in on my 12 Weeks of Christmas simply send me your information (Contact Me).

Thanksgiving with Paper Pumpkin

For those of us in Canada this coming weekend is Thanksgiving. A time to share what you are grateful/thankful for, get together with those you love and of course eat way too much food! And just like many of you whenever we go over to someone’s house for Thanksgiving dinner we always bring something with us as a thank you (usually a bottle of wine). I also add a little something extra like a card or a tag for the bottle.

In the past I’ve used stamp sets from the Annual Catalogue, but this past August’s Paper Pumpkin kit, A Gift of Love, was perfect! The kit itself helps you create 8 gift bags and here are the two projects that came straight from the kit instructions.

I also used the same stamp set and embellishments to make some tags that could then be attached to a bottle of wine or a gift bag. I only added some Crushed Curry and Very Vanilla cardstock (though you could easily use one of the tags from the kit and flip it over) as well I used the Delightful Tag Topper Punch.

PP alt Tags August 2019 wm

In terms of cards, Stampin’ Up! made it super easy with the add on bundle that included 24 card bases and envelopes. I had a lot of fun using the embellishments from the Gift of Love kit to create these cards. The two on the right I designed for those who attended my World Card Making Day event this past weekend.

I still have some supplies left so we’ll see what other inkspiration pops into my head!

Hopefully our family will enjoy the cards and tags when we see them this weekend and hopefully I don’t stuff myself TOO much. I hope you and your family have a Happy Thanksgiving whether you are celebrating this weekend or next month!

happy thanksgiving

Happy World Card Making Day!

World-Card-Making-Day

So what is World Card Making Day anyway?! It’s a day to celebrate the making of hand made cards of course! Store bought cards just don’t have the same feeling behind them and World Card Making Day reminds us that the best gifts come from the heart, and the hands of the people we love.

World Card Making Day started out as just something special for subscribers to Paper Crafts magazine back in October 2006, but it was so popular that it became a holiday for all card makers after that.

So where did greeting cards come from?! The greeting card as we know it actually came from ancient China as a way to celebrate the Chinese New Year. Then around the 15th century Europe started to give greeting cards as well for all different kinds of occasions; birthdays, thank yous, Christmas, special occasions, etc.

No matter what you use them for, cards are a great way to let someone know that you’re thinking about them. And what better way to celebrate World Card Making Day by making a card for someone you know, even if it’s just because!


Happy World Card Making Day everyone!!

Magnolia Thank You

I was running low on thank you cards which is something I use a lot of, as I’m sure you can imagine, and so I needed to make some more. I really like how these turned out so I thought I would share them with you all.

The idea for this batch of cards came from a set I just recently picked up. It’s Magnolia Blooms and comes from the Beginners Brochure which is like it’s own separate Stampin’ Up! catalogue for those just starting out and has some great stamp sets and kits that you can’t find in any of their other catalogues.

Beginner Brochure

So with this being the stamp set, I of course was wanting to incorporate the Magnolia Lane DSP, which I’m still loving so much! I also decided to keep this card clean and simple and used Whisper White cardstock for my card base.

I stamped “thank you” in Mossy Meadow to draw from the colours in the DSP and for the magnolia bloom I stamped in Tuxedo Black Memento ink. The reason behind the switch in ink colour was because I wanted to colour the image using the Watercolour Pencils (assortment 2). Although neither pack has Petal Pink or Mossy Meadow, I really like how the Flirty Flamingo and Garden Green worked out.

To highlight the DSP and stamped image/phrase even more I used two of the circles from the Stitched Shapes dies. Then to finish it off I added a few Pearl Basic Jewels.

Make sure to check out the project sheet for the full list of supplies and step by step instructions.

2019 Magnolia Thank You Project Sheet

Paper Craft Crew Challenge #352

PCC352 sketch

Things have been pretty busy lately and so it’s been a while since I participated in a sketch challenge. Now with things settling down a little bit I thought I’d join this week’s Paper Craft Crew Challenge. This week’s challenge was a vertical sketch challenge and had a few different elements to incorporate.

In terms of the colours for this challenge I decided to use Flirty Flamingo cardstock as my base along with Whisper White cardstock for most of my stamping. Flirty Flamingo was the main ink colour I used for this project, but I also added some Crumb Cake ink onto some Crumb Cake cardstock for a tone on tone effect. For the phrase I used one from the Strong & Beautiful cling stamp set and stamped it using Tuxedo Black Memento ink. The other stamp set I used for this project was the Butterfly Wishes cling stamp set.

I also used the Stitched Shapes Dies to create the oval and circle shapes for this challenge. For the other elements I used 1/4″ Copper Trim, which is what sparked the colour combinations for this project, and a few Rhinestone Basic Jewels.

Strong & Beautiful Mother wm

This project definitely took me outside of my usual creative box so I’d love to hear what you think about this project!

If you’d like to check out the other projects for this week’s Paper Craft Crew Challenge head over to their website…

papercraftcrew.com/pcc352

Give Thanks with Harvest Hellos

Give Thanks wm

I really enjoy the fall season… the leaves changing colour, apple and pumpkin picking with my two munchkins and the smell of hot mulled apple cider! And since I got the Harvest Hellos cling stamp set I’ve been having a lot of fun creating different projects and been thinking more and more about fall.

For this card I decided to use a few different elements all with the idea of fall and the outdoors. In terms of colours, I chose Crushed Curry and Terracotta Tile because they remind me of the colours we’ll be seeing on the trees soon. I also used Terracotta Tile cardstock and ink as well as the Apple Builder Punch for the pumpkin. There is a little bit of Crumb Cake cardstock for the stem of the pumpkin and Crumb Cake ink for the vines; a nice neutral colour which naturally lends itself well to this card.

To bring in the outdoors even more I used the Pinewood Planks 3D Embossing Folder for the card mat. I also decided to create a simple watercolour background to feature those rich fall colours some more. To make it I just used an Aqua Painter to brush Terracotta Tile and Crushed Curry across a piece of Fluid 100 Watercolour Paper. I tried to blend the two together in the middle so the change in colour was gradual and I think it turned out really well! Then I framed this piece with some Whisper White cardstock that I cut out using two of the square Stitched Shapes Dies.

For everything you need to recreate this card download the project sheet, complete with a supplies list and step by step instructions.

2019 Give Thanks Project Sheet